Master the Perfect Pumpkin Pie: No Cracks, No Soggy Crust
The aroma of cinnamon, nutmeg, and pumpkin baking in the oven is synonymous with autumn, holidays, and warmth. Yet, for all its nostalgic charm, perfecting a classic
pumpkin pie can feel like a culinary Everest. Bakers often grapple with a cracked surface that mars an otherwise beautiful dessert, or worse, a dishearteningly soggy bottom crust. The journey to a truly flawless pumpkin pie, one with a perfectly set, custardy filling, balanced spices, and a golden, unblemished surface, is a quest many undertake, and few conquer without significant trial and error. But what if we told you the secrets to overcoming these common baking woes are simpler than you think, distilled from years of dedicated culinary experimentation?
This article will guide you through the essential techniques and nuanced steps that elevate your pumpkin pie from good to truly extraordinary. We’ll delve into the optimal preparation of pumpkin puree, the critical role of pre-baking steps, and the art of achieving that coveted crack-free top, ensuring every slice is a testament to perfection. Say goodbye to pie anxiety and hello to your new signature holiday dessert.
The Quest for Pumpkin Pie Perfection: Why It's So Tricky
For a dessert that often appears straightforward – just "dump and mix" ingredients, right? – the
pumpkin pie holds a surprising number of pitfalls. Many home bakers find themselves frustrated by a variety of issues: a filling that's too watery or, conversely, too dry; an overwhelming spice blend that drowns out the delicate pumpkin flavor; or a cloyingly sweet profile that leaves taste buds fatigued. The dreaded "curdled" texture, rather than a smooth, silky custard, is another common complaint, indicating an imbalance in the dairy and egg proteins.
Perhaps the most visually impactful issues are the surface cracks and the perpetually soggy crust. Cracks often appear during cooling, a cruel twist after hours of effort, making an otherwise delicious pie look less appealing. And the soggy bottom? That’s the silent killer of pie enjoyment, leaving a disheartening layer of uncooked dough beneath your otherwise perfect filling. These challenges have plagued even seasoned bakers, leading to countless iterations and experiments in professional kitchens. Indeed, some culinary experts admit it took them years of dedicated testing to finally crack the code, confirming that this seemingly simple pie demands a nuanced approach to achieve its full potential. The good news is, their tireless efforts have revealed the proven methods that ensure your homemade pumpkin pie is not just good, but undeniably "The One."
The Secret to a Flawless Filling: Texture and Flavor Unleashed
The heart of any exceptional
pumpkin pie lies in its filling – its texture, its spice, and its fundamental pumpkin flavor. Achieving that perfect balance requires attention to detail, starting with your pumpkin puree itself.
Crafting the Ideal Pumpkin Puree
While canned pumpkin puree offers convenience, for those seeking ultimate control and an arguably fresher flavor profile, making your own is a rewarding endeavor. However, the method matters significantly. Many assume roasting pumpkin delivers the best flavor, and while it does for some applications, for pie, it can dry out the pumpkin too much, resulting in a thick, dense puree that yields a less-than-silky filling. Conversely, boiling pumpkin adds excess water, leading to a runny filling and an almost guaranteed soggy crust.
The optimal method, therefore, is
steaming. Steaming pumpkin pieces ensures they become tender without absorbing additional water or losing too much. Once steamed, the pumpkin can be easily mashed or pureed in a food processor, then passed through a fine-mesh sieve. This final step is crucial for achieving an incredibly smooth, lump-free consistency that closely mimics the texture of high-quality canned pumpkin puree. This method yields a puree with the ideal moisture content, setting the stage for that perfect, soft, custardy filling. For a deeper dive into pumpkin preparation, explore
Unlock Rich Flavor: Best Pumpkin Puree Techniques for Your Pie.
The Game-Changing Pre-Bake Simmer
Here’s a technique that truly sets a superior
pumpkin pie apart and directly tackles the dreaded soggy bottom. Most recipes instruct you to simply combine all filling ingredients and pour them into the crust. However, a crucial step often overlooked is to *gently cook* the pumpkin and spices together for about 5 minutes before adding the other liquid ingredients and baking.
Why is this so effective? First, it allows a small amount of excess water, present in both fresh and canned pumpkin, to evaporate. This significantly reduces the moisture that would otherwise seep into your crust during baking, practically eliminating the risk of a soggy bottom. Second, this gentle heating allows the spices – cinnamon, ginger, nutmeg, cloves – to "bloom." Blooming spices in a warm, moist environment releases their aromatic oils, intensifying their flavor and distributing them more evenly throughout the pumpkin. This simple, 5-minute pre-bake simmer results in a filling with a noticeably improved texture and a far more vibrant, complex flavor profile that truly highlights the pumpkin without overpowering it. After this foundational step, the rest *does* become a simple dump-and-mix job.
Achieving the Perfect Spice Balance
The right blend of spices transforms a plain pumpkin base into a fragrant, festive treat. The goal isn't to create a "spice bomb" but rather to enhance and complement the natural sweetness and earthiness of the pumpkin. A classic blend typically includes cinnamon, ginger, nutmeg, and sometimes a hint of cloves or allspice. The key is moderation and quality. Using freshly ground spices whenever possible will yield a much more potent and nuanced flavor than older, pre-ground varieties. The gentle simmer step mentioned above is invaluable here, ensuring these aromatics fully integrate and awaken within the filling. When it comes to sweetness, aim for a balance that allows the pumpkin to shine through, not one that overwhelms it. Many excellent recipes find success with a combination of brown sugar (for its molasses notes) and white sugar, ensuring the pie is sweet, but not "crazy sweet."
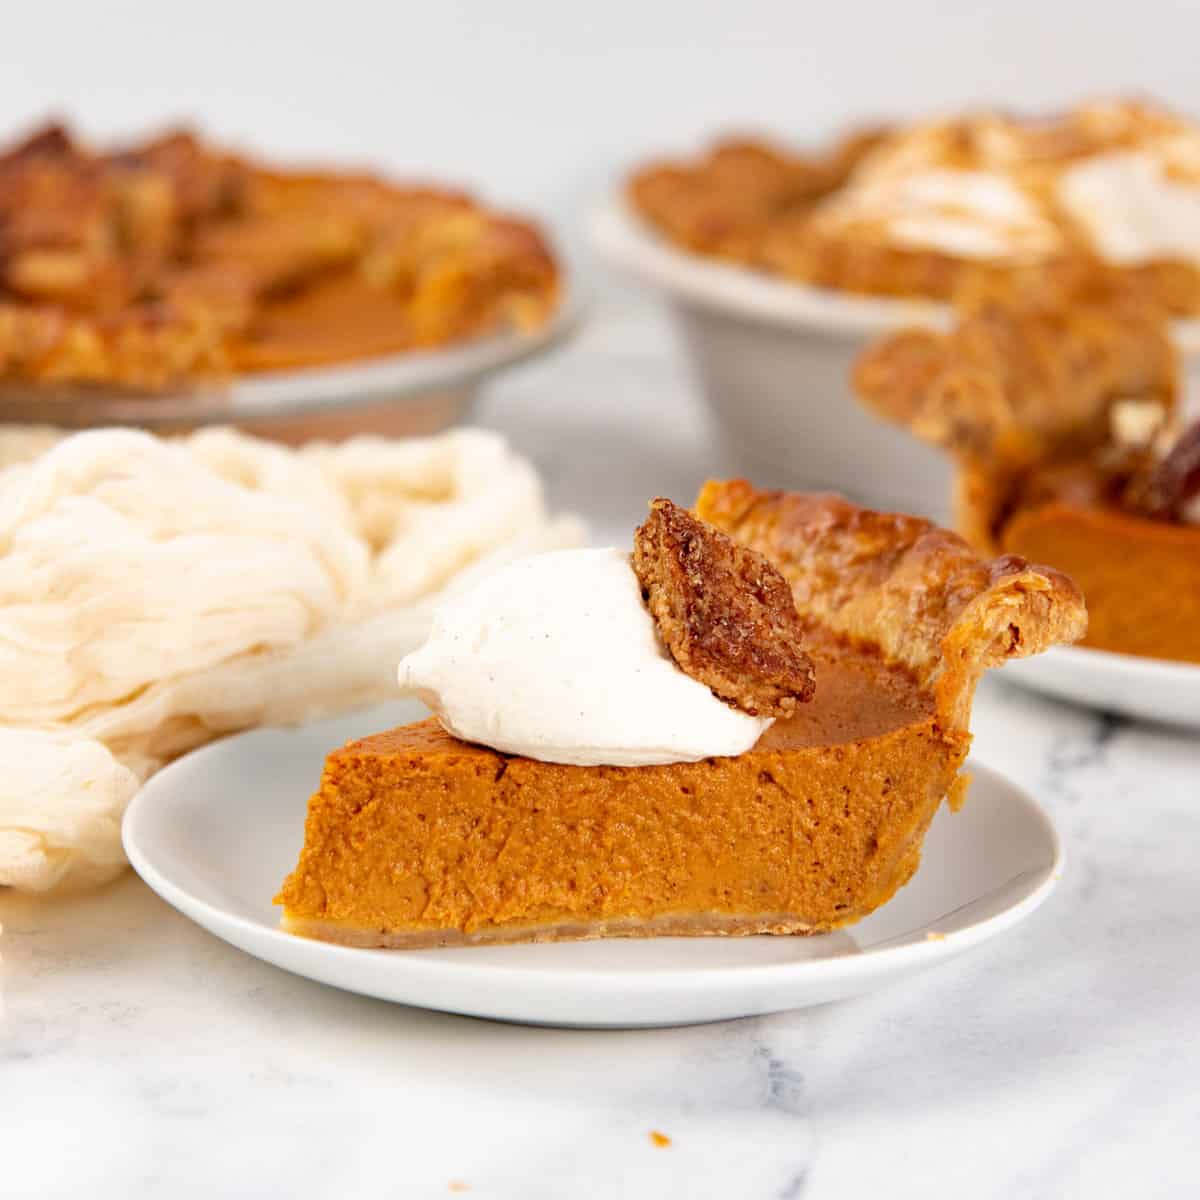
Bidding Farewell to Cracks and Soggy Bottoms
The twin banes of
pumpkin pie bakers – the cracked surface and the soggy bottom – can be entirely avoided with a few strategic techniques that focus on the crust, the baking process, and the all-important cooling phase.
Mastering the Crust
Your pie begins and ends with its crust. While a good quality store-bought crust offers convenience, mastering a homemade one elevates your pie significantly. Many are intimidated by homemade crusts, but with a food processor, a perfect pastry comes together in mere minutes. The key is to keep ingredients cold, work quickly, and avoid overworking the dough to ensure a tender, flaky result.
To combat a soggy bottom, beyond the filling preparation, a crucial step is
blind baking (or pre-baking) your pie crust. This involves partially baking the empty crust before adding the filling. Line your pastry shell with parchment paper, fill it with pie weights, dried beans, or rice, and bake until the edges are set and lightly golden. This creates a barrier, preventing the wet filling from turning the bottom into a gooey mess. Ensure your crust is adequately chilled before blind baking to prevent shrinkage.
The Gentle Bake and Cool
Cracks in
pumpkin pie are often a symptom of overbaking or sudden temperature changes. The custard filling is delicate, and as the egg proteins set and firm up, they can shrink. If baked too long, or at too high a temperature, the outer edges set and dry out faster than the center, causing the surface to pull apart and crack during cooling.
The trick is to bake the pie just until the edges are set, but the very center still has a slight jiggle. It should resemble a perfectly set panna cotta – firm, yet yielding. A common test is to insert a knife blade or skewer about an inch from the edge; if it comes out clean, the pie is likely done.
Equally important is the cooling process. Avoid abrupt temperature shifts. Once out of the oven, allow your
pumpkin pie to cool gradually at room temperature. Don't immediately transfer it to the refrigerator. A slow, gentle cool-down allows the custard to set uniformly and prevents the internal stress that leads to cracking. Minor, hairline cracks at the very edge can sometimes occur, and truthfully, are perfectly normal and barely noticeable. The goal is to avoid those gaping chasms that truly detract from the pie's aesthetic. For an in-depth look at a recipe perfected over years of trials, check out
The Ultimate Pumpkin Pie Recipe: 5 Years to Flawless Perfection.
Beyond the Basics: Elevating Your Pumpkin Pie Experience
Once you’ve mastered the foundational techniques for a crack-free, non-soggy
pumpkin pie, consider how to enhance the overall experience. The perfect slice is more than just flawless texture; it's about presentation and accompaniments.
Serving your pumpkin pie with a generous dollop of freshly whipped cream is not merely an option, it's virtually essential. The airy, creamy texture and subtle sweetness of whipped cream provide a delightful contrast to the rich, smooth pumpkin filling. For an extra touch of sophistication and flavor, consider garnishing with sugared cranberries, candied pecans, or a sprinkle of extra cinnamon. These additions not only elevate the visual appeal but also introduce complementary textures and flavors that make each bite an unforgettable experience.
Storage is also simple: cover your cooled pumpkin pie loosely with plastic wrap or foil and refrigerate for up to 3-4 days. It tastes fantastic chilled, allowing the flavors to meld even further.
Conclusion
The journey to baking the perfect
pumpkin pie – one that boasts a soft, velvety filling, a perfectly balanced spice profile, a robust, unyielding crust, and a pristine, crack-free surface – is a rewarding one. It’s a testament that even the simplest recipes can hide complex challenges, but with the right knowledge and techniques, they are entirely surmountable. By paying meticulous attention to your pumpkin puree, embracing the subtle yet powerful pre-bake simmer, and managing your baking and cooling with care, you will consistently achieve a pie that not only looks stunning but tastes sublime. This holiday season, embrace these tried-and-true methods and prepare to impress everyone at your table with a pumpkin pie that truly lives up to its iconic status.